
Background
This project is based off of the Forrest Brazeal’s cloud resume challenge that challenges participants to build a resume website using AWS cloud infrastructure; building and configuring services in a CI/CD Pipeline.
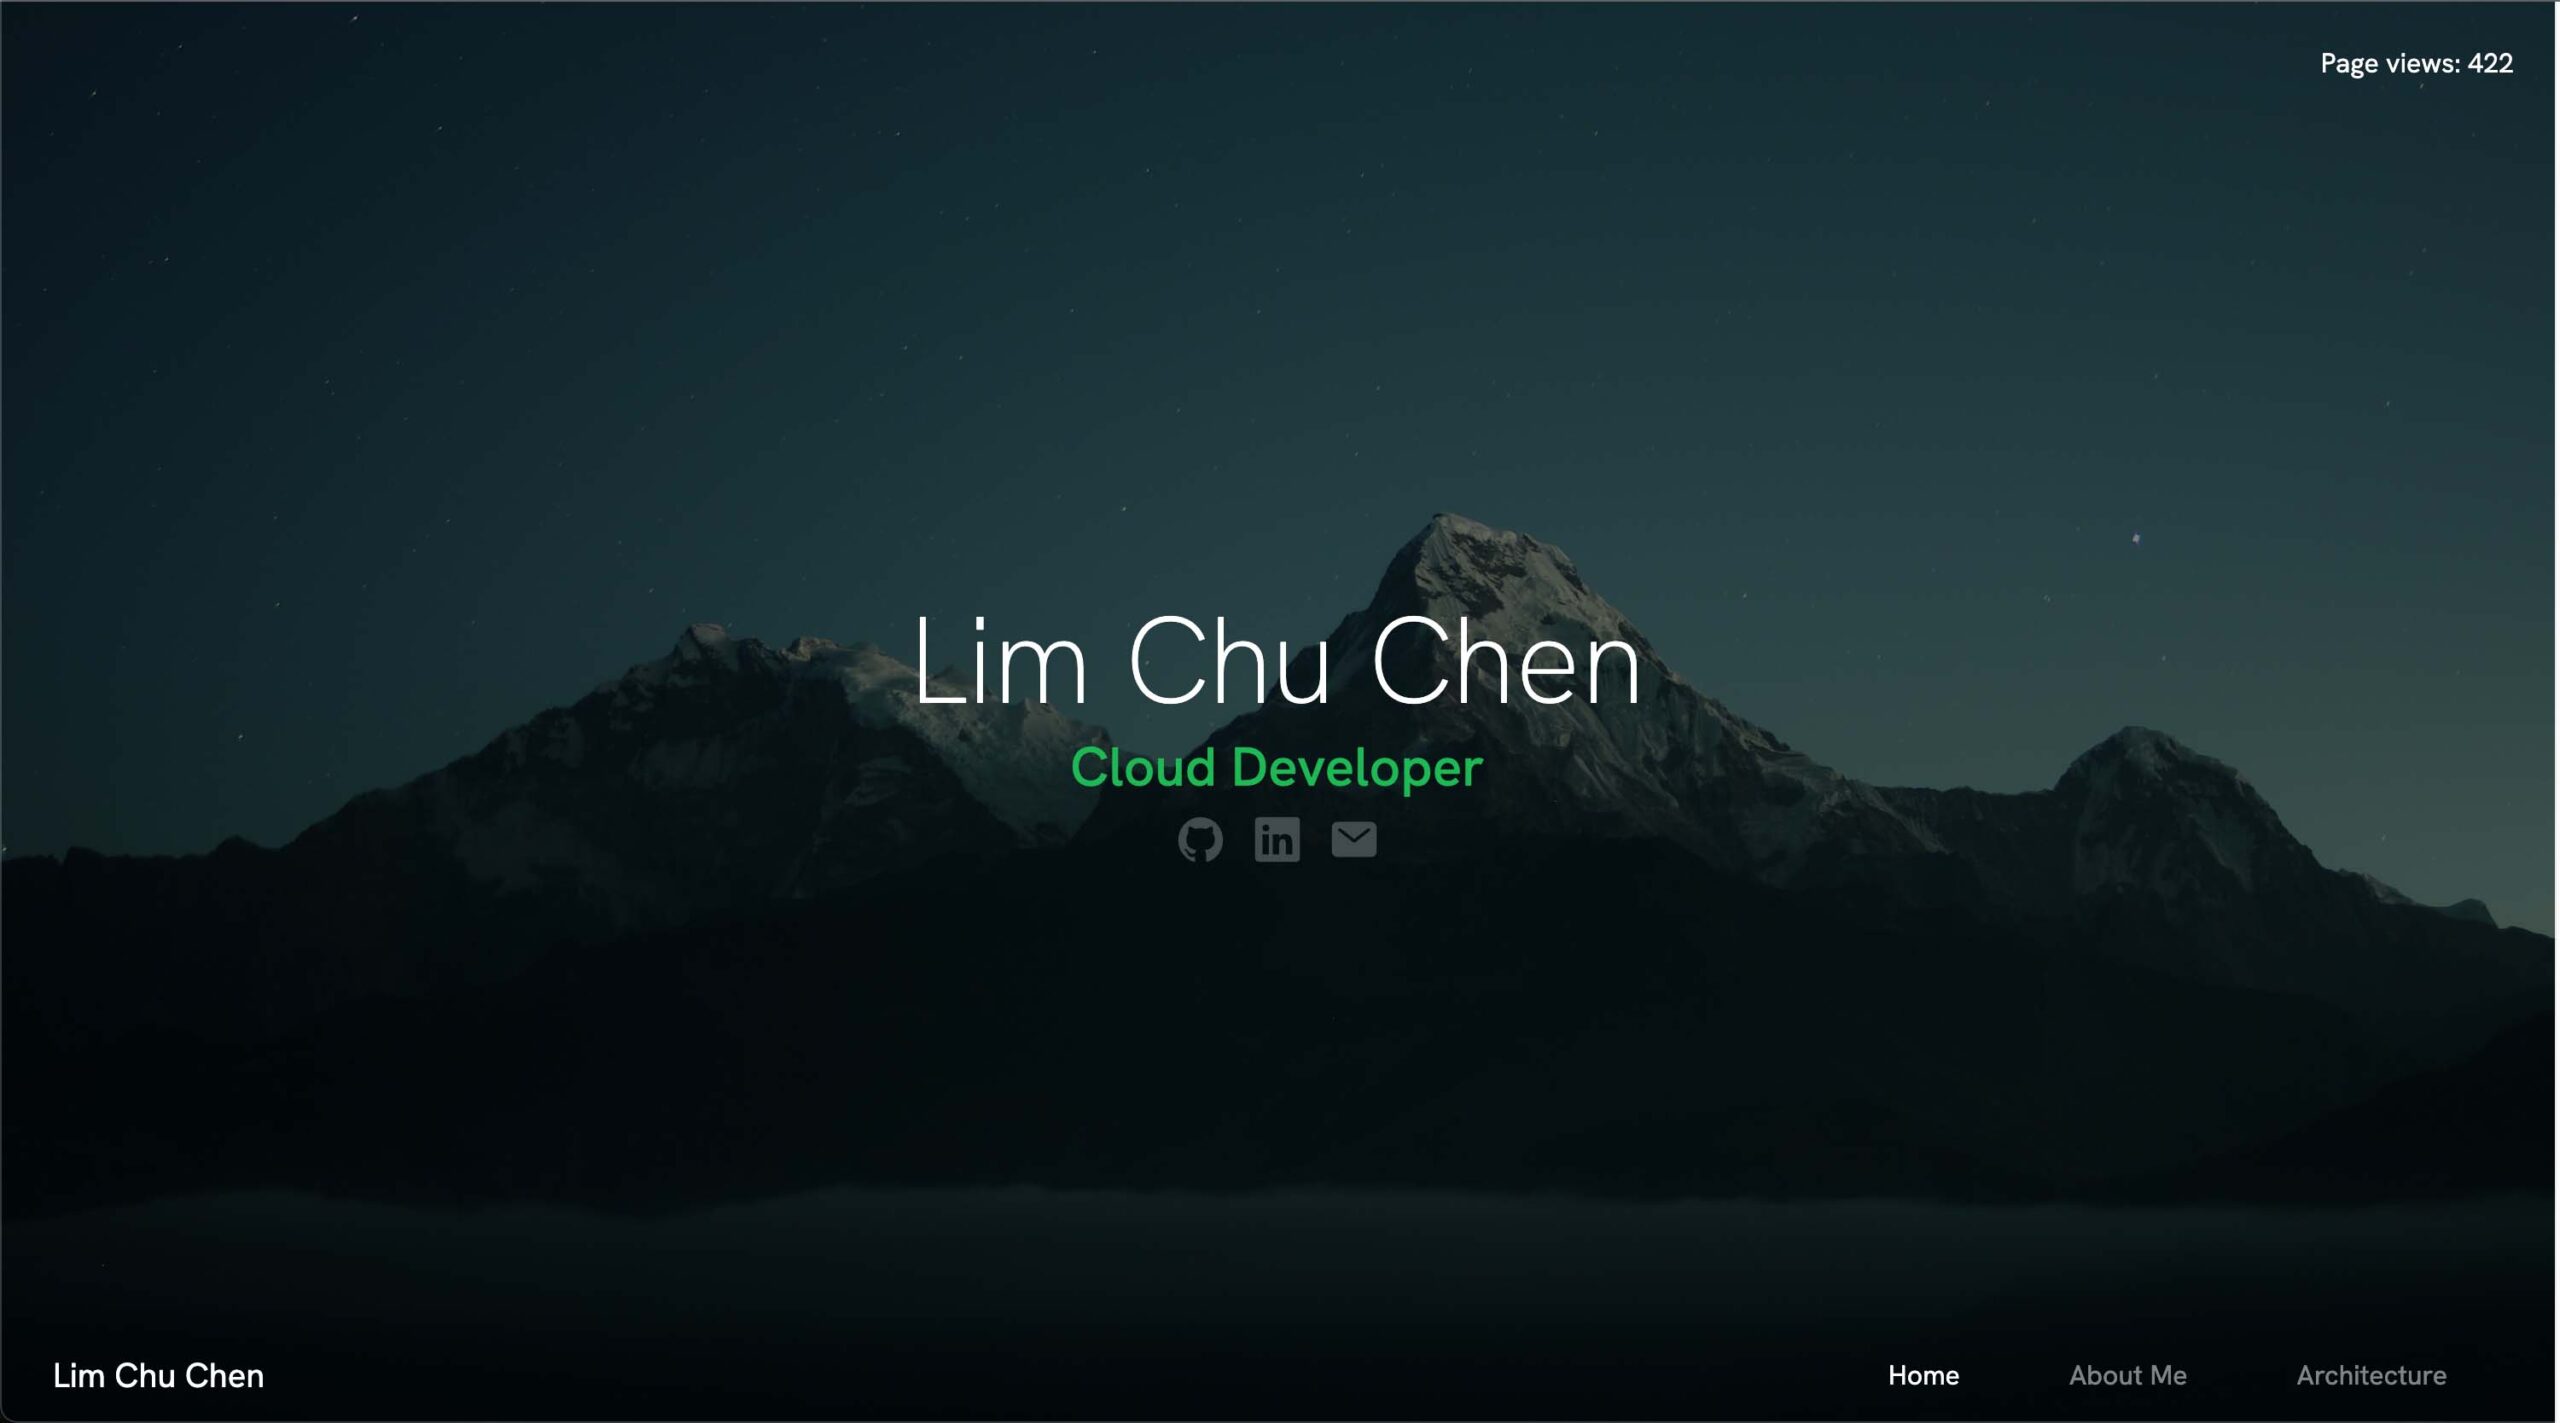
Visit my cloud resume to view my attempt at this challenge: www.kevinlim.cc. The documentation are all written on that hosted page and files can be found from this github project page.
Scope
The scope of this project is to provide hands-on experience to solidify what I have learnt when obtaining my Solutions Architect certification. Skills such as configuration and integration of the website with various serverless cloud services such as DynamoDB, API Gateway, Amazon S3, Route 53, and Lambda functions can prove invaluable in the real-world deployment of production sites. Moreover, code version control like Git coupled with AWS CodePipeline was also implemented to provide a CI/CD pipeline to automate deployment of the site.
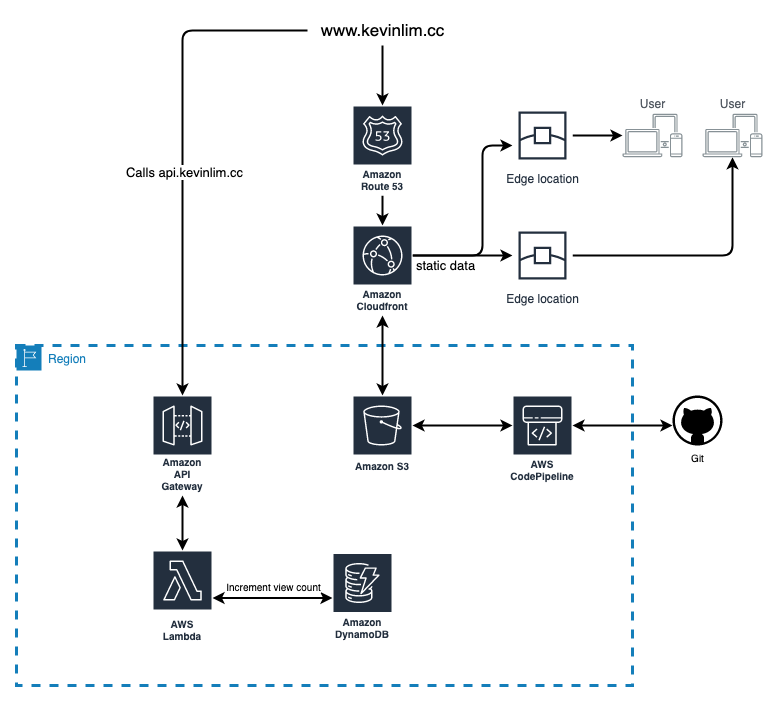
The architectural diagram of this infrastructure is as so:
1. Static site hosting
Firstly, I had to decide how I was going to host this site. Since this will be a static site with no dynamic content, Amazon S3 is a great choice to provide a highly-available, secure and simple way to host this site. I followed this guide to provision my S3 bucket for hosting. One thing to take note is that the name of the bucket must be globally unique, and has to be the same name as your domain name for the static hosting to work.

After creating the bucket, make sure to enable static website hosting in the properties tab of the bucket and disable all public access to the bucket as we will interface the bucket with a CloudFront distribution later.
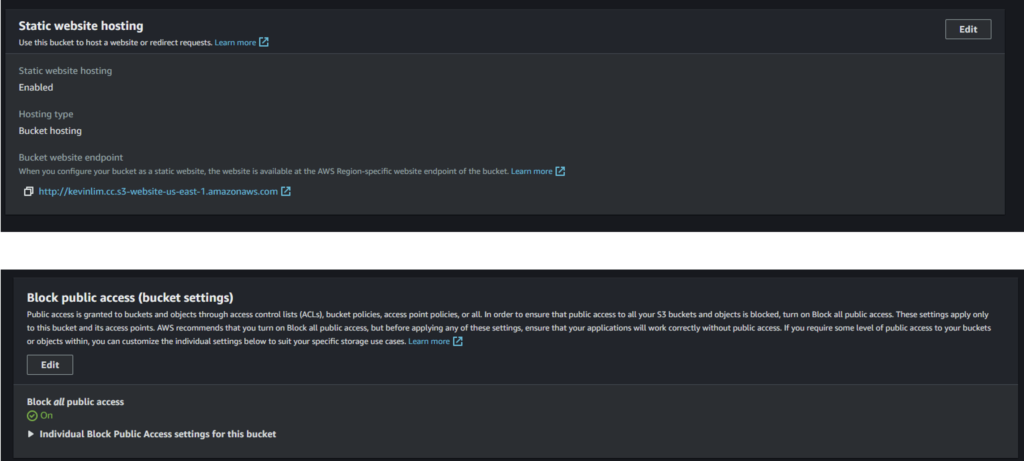
For now leave the rest of the bucket at a default, and we will configure the CI/CD deployment in the next section to populate the S3 bucket with our static files.
2. CI/CD deployment with CodePipeline
Next, to enable automated deployment of our Git files, we will create a pipeline via AWS CodePipeline, and link it to Github via a connection. To do that, view the CodePipeline console of your region and create a pipeline. Name the pipeline, click on create a new service role and input the role name. This will create a new role in your IAM console which provides permissions for this Pipeline to access your other AWS resources. Leave the rest at default, and click `Next`

In the source section, use Github V2 as the source provider, and click `connect Github` to create a new connection. You will be required to log-in with your Github credentials. After a connection is made, select the repository that you want to deploy, and select the branch. Check `start the pipeline on code changes` and click `Next`.

Since this deployment is a static site and there is no resource building required, skip the building step and click `Next`. In the deployment stage, select Amazon S3 as the deployment provider, and select the bucket we created in the previous step. Check the ‘Extract file before deploy’ before and click next. Finalise the pipeline deployment by clicking ‘Create Pipeline’ in the review stage.

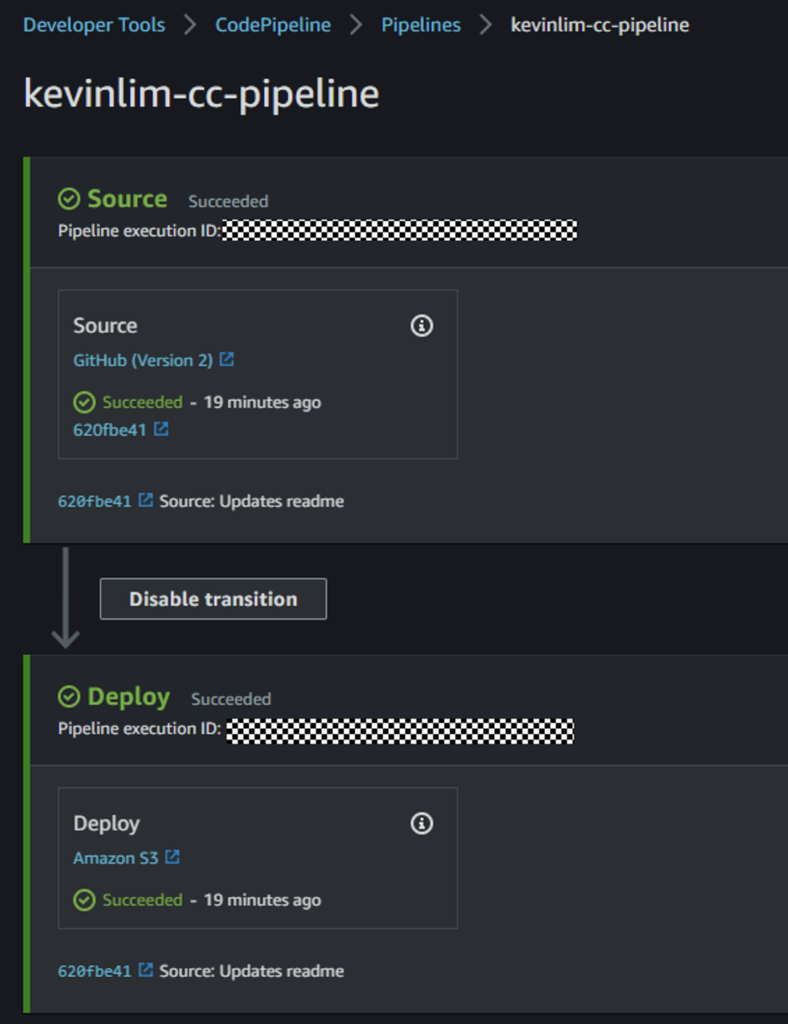
Once the pipeline is created, you can push the site files into the repository and verify that CodePipeline automatically uploads all the files to the S3 bucket.
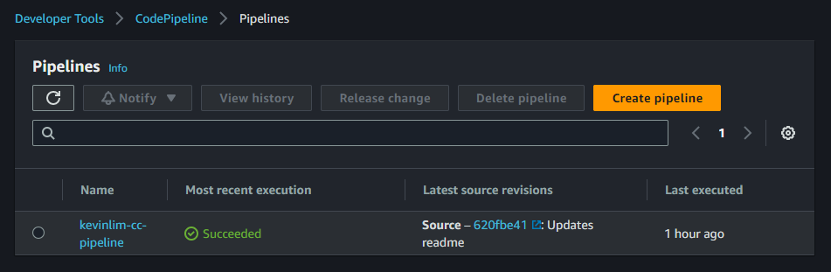
Now we have a working automated deployment of our main branch. Files pushed to this branch will automatically trigger the pipeline to update the files to the S3 bucket.
3. DNS configuration using Route 53
Now that we have the front-end of the site working via S3, we will need to create a domain name so that this site can be hosted from a personal domain name. To do that, I purchased and registered a domain name using Amazon Route 53.
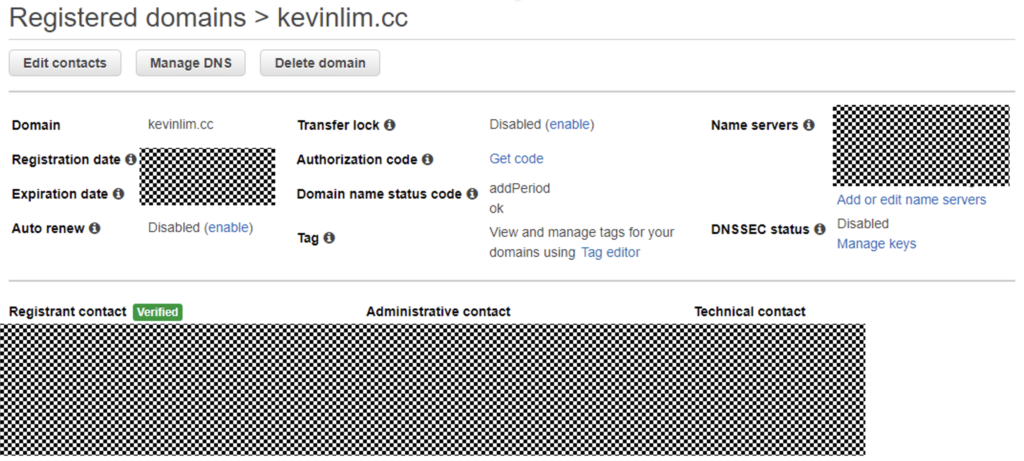
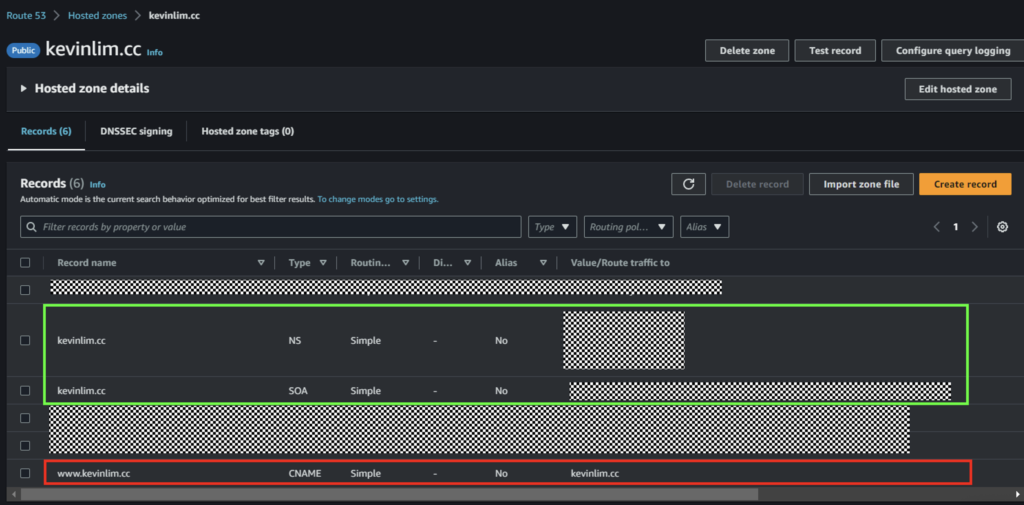
Once the domain is verified and registered, check the hosted zone of this domain. There should be a several default routes (green box) created when the domain purchase has been verified. We will need to create a new CNAME record that routes our subdomain ‘www.kevinlim.cc’ to our apex domain ‘kevinlim.cc’ so visitors that visit the ‘www’ subdomain would be automatically redirected to our apex domain ‘kevinlim.cc’ (red box). Later on, we will need to configure new routes when we create our API and CloudFront distribution. For now, just create this URL redirection CNAME record.
4. CloudFront Global Content Caching
To speed up content delivery with minimal latency, we can leverage Amazon CloudFront content delivery network (CDN). CloudFront caches the contents of our S3 bucket to its servers in multiple geographic locations (known as edge location), so that users can access the content from a location that’s closer to them, effectively reducing the latency and improving user experience.
Using CloudFront also allows us to configure and attach an SSL certificate so that the site is secured via HTTPS as the S3 hosting does not support hosting in HTTPS natively.
To do that, we will have to create a CloudFront distribution, and select our S3 bucket as the origin domain. To prevent the users from accessing the site through the S3 bucket endpoint directly and bypass the CloudFront distribution, we need to deny all public access to the S3 bucket and only allow it from the CloudFront distribution. We can do that by checking ‘Origin Access Control Settings’ under the Origin access section.
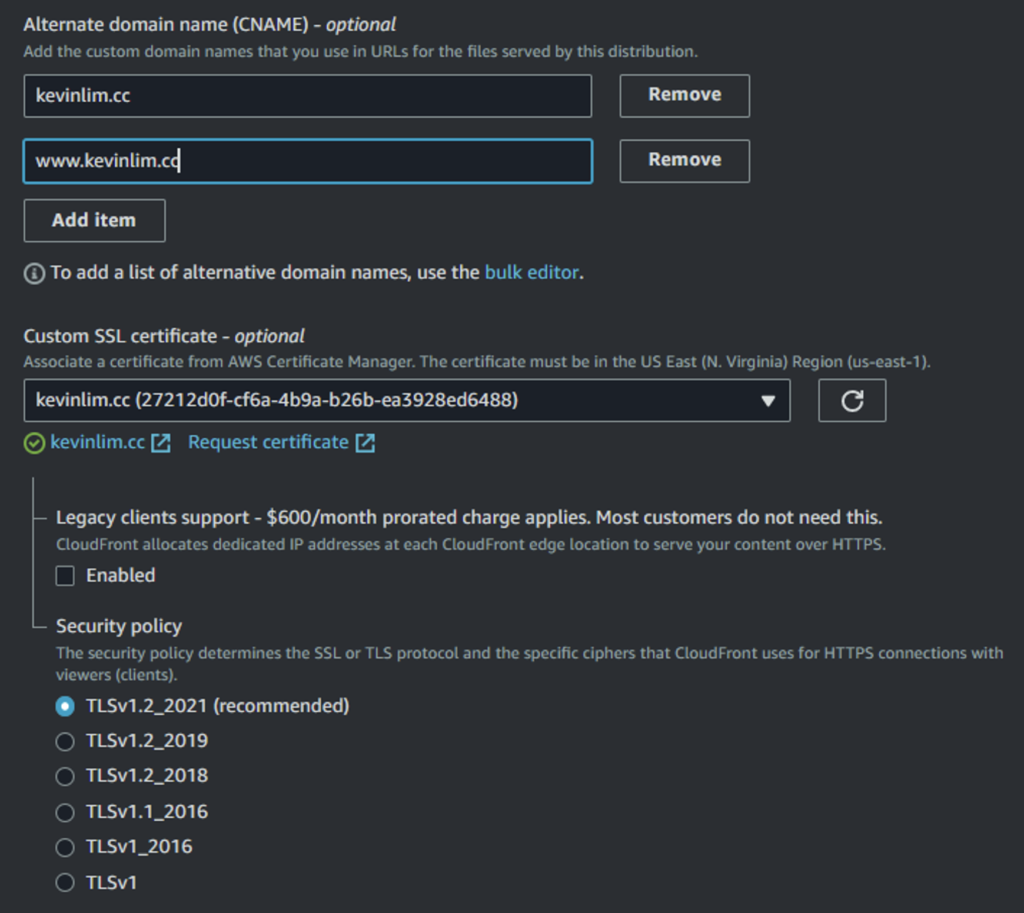
Leave the caching behavior as a default, with the ‘CachingOptimized’ policy selected. Next, for our personal domain to redirect to the distribution, we will need to modify the Alternate domain name (CNAME) section by adding our domain. We will also need to create an SSL certificate which we can request from the AWS Certificate Manager, and adding the authorization route to our R53 hosted zone (guide here). Once we have the SSL certificate, click on ‘create distribution’.
After a few minutes, we can see that the distribution is created with our distribution ID and the domain name.

After our distribution is successfully provisioned, we need to modify the bucket policy in the S3 console to allow CloudFront to access the bucket (replace INPUT_AWS_ACC_ARN_HERE and INPUT_CLOUDFRONT_DISTRIBUTION _ARN_HERE with your account ARN and CloudFront distribution ARN):
{
    "Version": "2008-10-17",
    "Id": "PolicyForCloudFrontPrivateContent",
    "Statement": [
        {
            "Sid": "AllowCloudFrontServicePrincipal",
            "Effect": "Allow",
            "Principal": {
                "Service": "cloudfront.amazonaws.com",
                "AWS": "INPUT_AWS_ACC_ARN_HERE"
            },
            "Action": "s3:GetObject",
            "Resource": "arn:aws:s3:::kevinlim.cc/*",
            "Condition": {
                "StringEquals": {
                    "AWS:SourceArn": " INPUT_CLOUDFRONT_DISTRIBUTION _ARN_HERE "
                }
            }
        }
    ]
}
Now, you can visit the CloudFront domain name to view your site hosted on S3! All of the S3 contents are now cached on the content distribution servers within CloudFront.
To route our domain to the CloudFront domain, we will need to add a type A simple record to the CloudFront domain (red box). For our SSL certificate verification, we need to add a CNAME record (blue box).
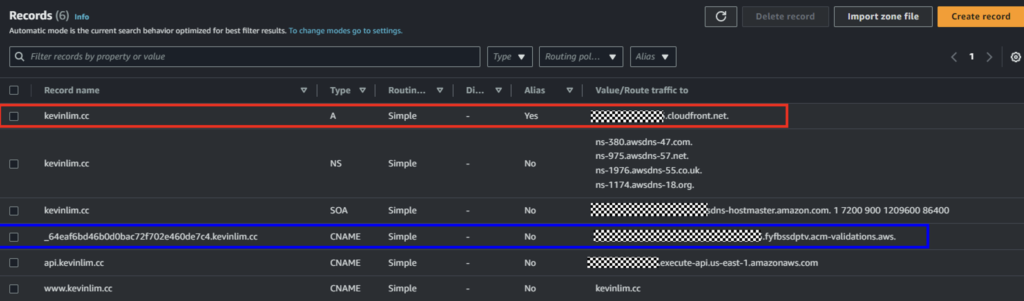
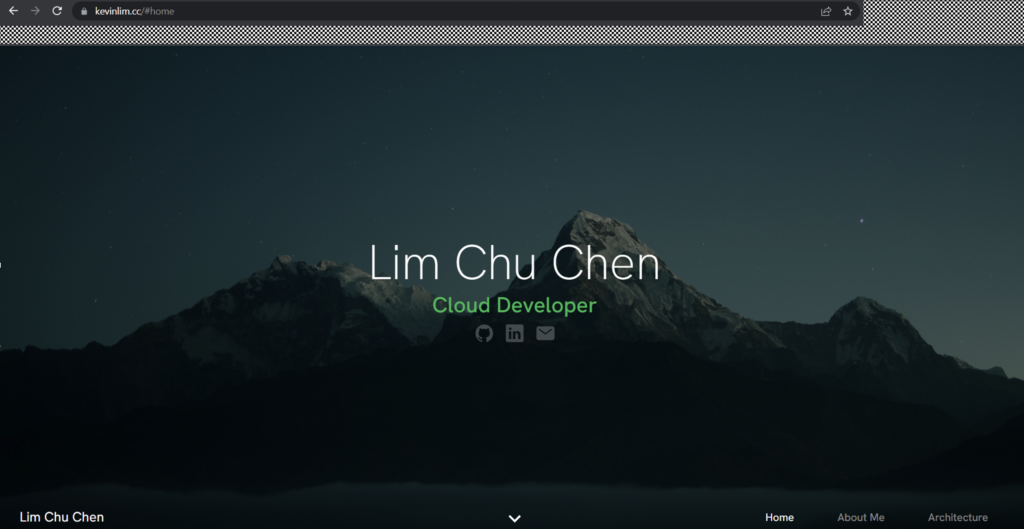
Finally, visiting the ‘kevinlim.cc’ or ‘www.kevinlim.cc’ domain will redirect us to the CloudFront distribution and our webpage will be shown.
5. DynamoDB
Part of the challenge was to add a view counter for every view that this website receives. To do that, we will need to store the view counts in a database. We will use a fully managed noSQL Database from Amazon called DynamoDB. DynamoDB supports key-value pairing which is suitable for our simple use case.
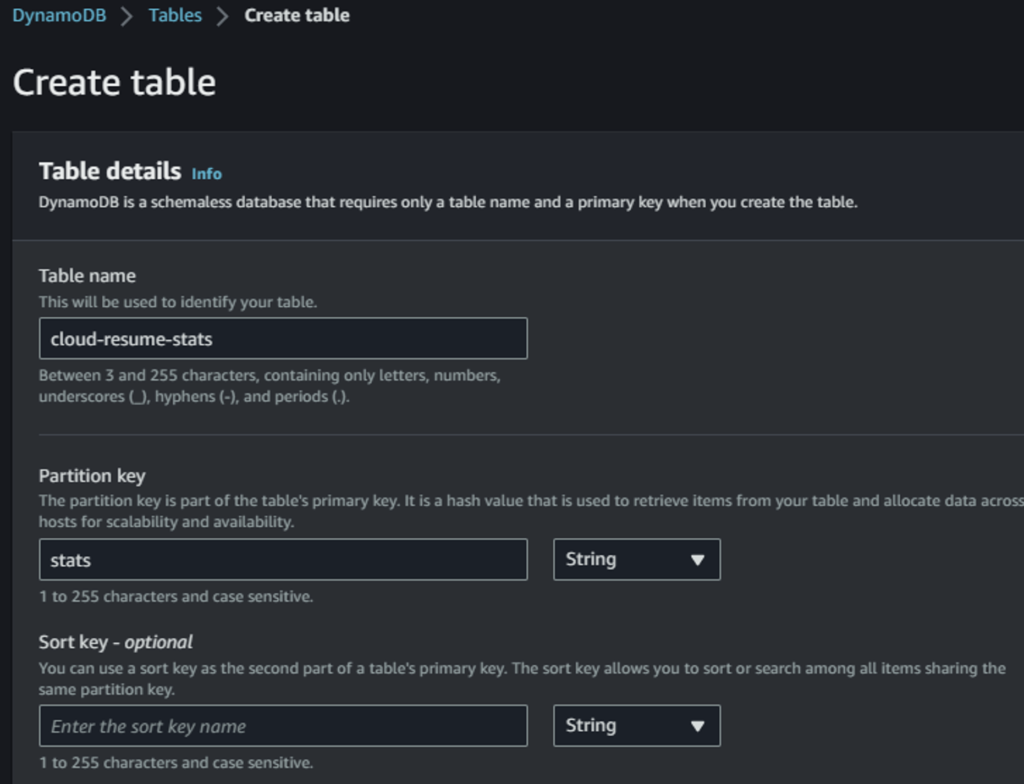
To create a table, visit the DynamoDB console and click on `Create Table`. Name the table anything you like and set the partition key as `stats` with string as the type. Leave the rest as default and click `Create Table`. After a few minutes, you should have a table fully provisioned and active.

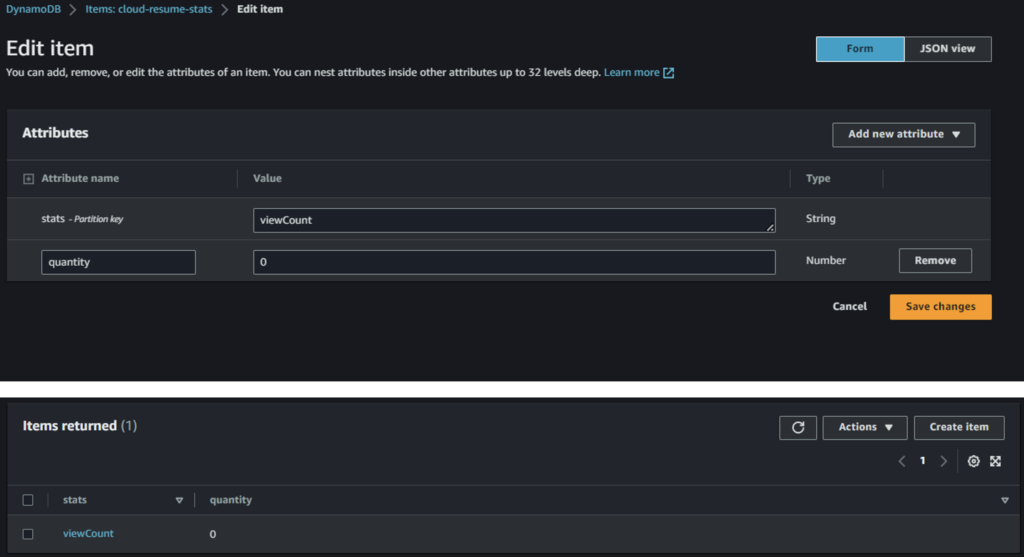
To add an attribute to the table, click `Explore table items` and click on ‘create item’. We will add viewCount as the value of our partition key, and add a new attribute of quantity with type Number, and a value of 0.
6. API Gateway and Lambda Function Integration
Next, we will implement an API to increase the view counter every time someone visits the website. The logic works like this: when visiting the site, the client-side Javascript will call the API handled by Amazon API Gateway which in turn will invoke the integrated Lambda function.
We first can create a Lambda function, name it and define the runtime of this function (in my case, I picked Python v3.9, using boto3) and leave the rest as a default.

Once the function has successfully created, you should see your new lambda environment in the Functions section.

The Lambda function will first read the DynamoDB table for the existing view count, add one to the counter, and save the counter to display to the front-end. In the code tab, paste the following code and replace TABLE_NAME with your DynamoDB table name:
import json, boto3

dynamodb = boto3.resource('dynamodb')
table = dynamodb.Table('TABLE_NAME')

def lambda_handler(event, context):
    response = table.get_item(
        Key={
            'stats': 'viewCount',
            }
    )
    view_count = int(response['Item']['quantity'])
    table.update_item(
        Key={
            'stats': 'viewCount',
            },
        UpdateExpression='SET quantity = quantity + :inc',
        ExpressionAttributeValues={":inc" : 1},
        ReturnValues='UPDATED_NEW'

    )
    return {
            'statusCode': 200,
            'body': str(response['Item']['quantity'])
    }
Next, to trigger an invocation of this Lambda function, we can create an API using API Gateway to act as a trigger for our Lambda function and this can all be done within the Lambda console UI.


After the API is created, the API endpoint (Invoke URL) can then be used to trigger our Lambda function. If we called this API straight from our domain, we will get a CORS error as the domain of the API is different from our site domain. This is a safety feature that’s built within modern browsers to prevent malicious API calls. Therefore, we have to create a new subdomain to our Route53 hosted zone to redirect all requests to this API as shown:

Now, we can call api.kevinlim.cc and it will redirect it to the API Gateway endpoint and thus we will not receive any CORS errors. Finally, we just have to modify the client javascript to call api.kevinlim.cc and it will trigger our API to invoke the lambda function and show the page views.
Conclusion
That’s it! Now we have a fully serverless web resume that’s hosted on the cloud. This project presented a refreshing challenge, motivating me to do a lot of reading about the different AWS services’ documentations. I have learnt CI/CD automation for cloud infrastructure. In the future, further automation with an Infrastructure as Code tool like Terraform would be implemented to manage all the resources.
Thank you for reading! If you have any questions or any job opportunities in the Cloud sector, don’t hesitate to contact me via my e-mail and check out my Github for more projects like this!