
Background
Developed a serverless web application on AWS using an Infrastructure as Code (IaC) approach with AWS Amplify, RDS, API Gateway, Lambda functions, DynamoDB, and Amazon Cognito.
- Designed and implemented a scalable and secure architecture using AWS Amplify for the frontend and API Gateway for the backend services, providing a seamless user experience.
- Leveraged RDS to store and manage application data, ensuring data consistency and durability.
- Utilized Lambda functions for serverless computing, providing efficient and cost-effective processing.
- Implemented DynamoDB for NoSQL database, with automatic scaling and backup features, ensuring high performance and availability.
- Integrated Amazon Cognito for user authentication and authorization, ensuring secure access control and data protection.
- Used Infrastructure as Code (IaC) approach with AWS Amplify CLI and Terraform plans, enabling automated provisioning, configuration, and deployment.
I’ve been practicing on setting up a web application on AWS following this guide. The guide provides clear instructions on how one should provision AWS resources to get a completely serverless on-demand ride booking application (think Uber but with unicorns). The challenge that I gave myself while following the guide was to set up all these resources using code (IaC), allowing for a fast, non-error prone provisioning and removing of these resources at scale.
Scope
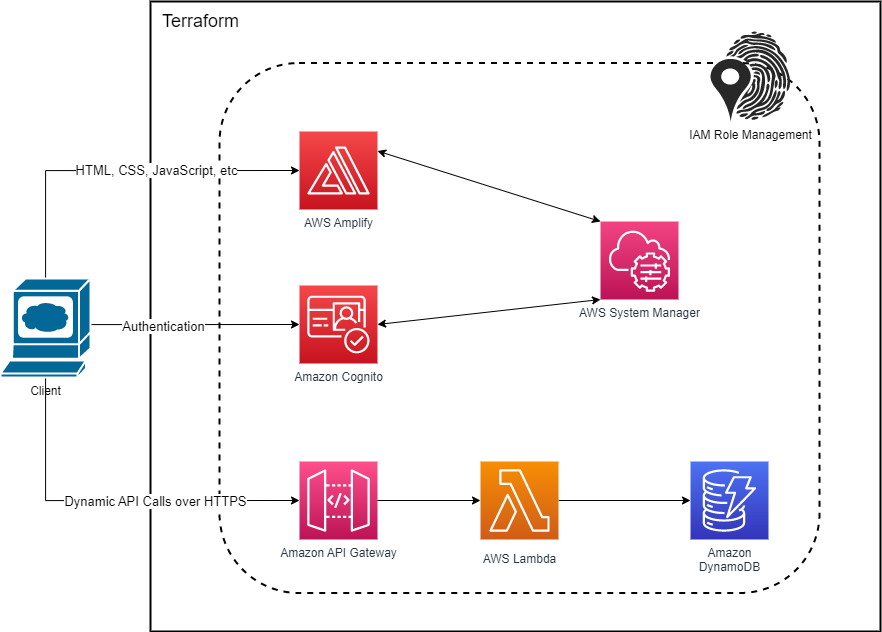
The scope of this project is broken down into four main components: The serverless front-end resources, the user and permissions management, the serverless back-end resources, and finally the RESTful API deployed which gives the main function to the site. In the sections below, I will explain my approach to each of these aspects and how I was able to integrate each one of them in an Infrastructure as Code (IaC) manner.
The cloud architecture can be depicted as such:

If you want to replicate this project in your environment, you can find all resource files and codes from my Github project page.
Infrastructure as Code
Before I started working on this project, I had to research on the multitude of available IaC tools and choose between them. I ended up picking Terraform to build up and organise my cloud resources. Terraform is a cloud-agnostic tool that can provision and manage infrastructures in a human-readable configuration file. The main reason for me picking Terraform is due to its design that allows for seamless resource provisioning between cloud providers, instead of limiting to a single provider. Although I will only be using AWS as my cloud provider in this project, Terraform allows me to easily port my project over to a different cloud provider if ever there is a need.
Part 1: The Serverless Frontend
This project starts out with cloning the demo repo from the guide above, and setting up my resources to host the static site in the repo. I’m using the AWS provider as I will be only be using AWS cloud for this project.
provider "aws" {
    region = "us-east-1"
    access_key = var.AWS_ACCESS_KEY_ID
    secret_key = var.AWS_SECRET_ACCESS_KEY
}
To start, I will be using AWS Amplify to host the site. AWS Amplify provides a complete solution to manage a full-stack applications on AWS, without the need to manage any servers. It comes coupled with an integrated CI/CD Pipeline and an extensive and well documented CLI. I created a ‘create-amplify-env’ module in main.tf which creates an amplify web-app resource to host the repo. Most of the settings are left at a default except for the build_spec; it imports the authentication details from Amazon Cognito and runs some Amplify CLI commands to configure and integrate Cognito to the Web App (more on that in the Cognito section).
*PS: Make sure not to push your AWS ACCESS KEY, GITHUB TOKEN, and SECRET ACCESS KEY to your repository!
module "create-amplify-env"{
    source = "./modules/awsAmplify"
    source-repo = "https://github.com/kevinchuchen/webapp-wildRydes"
    GITHUB_ACCESS_TOKEN = var.GITHUB_ACCESS_TOKEN
    AMPLIFY_WEBCLIENT_ID = module.create-Cognito-resource.clientId
    AMPLIFY_USERPOOL_ID = module.create-Cognito-resource.userPoolId
    AMPLIFY_NATIVECLIENT_ID = module.create-Cognito-resource.clientId
    API-GW-InvokeUrl = module.create-API-Gateway.API-GW-InvokeUrl
}
resource "aws_amplify_app" "amplify" {
    name = var.amplify-name
    repository = var.source-repo
    access_token = var.GITHUB_ACCESS_TOKEN
    iam_service_role_arn = aws_iam_role.amplify-backend-role.arn
    enable_branch_auto_build = true

    build_spec = <<-EOT
        version: 1
        backend:
            phases:
                build:
                    commands:
                        - '# Execute Amplify CLI with the helper script'
                        - yum install jq -y
                        - npm i amplify-headless-interface
                        - amplifyPush --simple
                        - echo $secrets > authconfig.importauth.json
                        - cat authconfig.importauth.json | jq -c '. += {"version":1}' | amplify import auth --headless
                        - amplifyPush --simple

        frontend:
            phases:
                preBuild:
                    commands:
                        - npm install
                build:
                    commands:
                        - npm run build

            artifacts:
                baseDirectory: dist
                files:
                - '**/*'
            cache:
                paths:
                    - node_modules/**/*

    EOT

    description = "Creates a new AWS amplify environment to host your webapp."

    custom_rule {
        source = "</^[^.]+$|\\.(?!(css|gif|ico|jpg|js|png|txt|svg|woff|ttf|map|json)$)([^.]+$)/>"
        status = "200"
        target = "/index.html"
    }
    custom_rule {
        source = "/<*>"
        status = "404"
        target = "/index.html"
    }
    environment_variables = {
        USER_BRANCH = "prod",
        _LIVE_UPDATES = <<-EOT
         [{"name":"Amplify CLI","pkg":"@aws-amplify/cli","type":"npm","version":"latest"}]
         EOT
        AMPLIFY_NATIVECLIENT_ID = var.AMPLIFY_NATIVECLIENT_ID
        AMPLIFY_USERPOOL_ID = var.AMPLIFY_USERPOOL_ID
        AMPLIFY_WEBCLIENT_ID = var.AMPLIFY_WEBCLIENT_ID
        API_GATEWAY_INVOKEURL = var.API-GW-InvokeUrl
    }

}

resource "aws_amplify_branch" "main" {
  app_id      = aws_amplify_app.amplify.id
  branch_name = "main"
  enable_auto_build = true

  framework = "Vue"
}
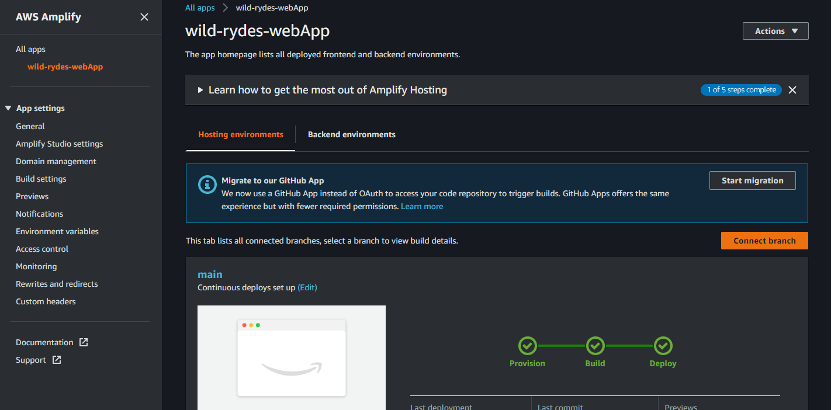
Once the terraform plan is applied, you can log in to your AWS account and check the app that was created by Terraform. You can click on `start build` to start building your app, and wait for AWS Amplify to configure an instance to host your app. The terraform configuration above also sets up a CI/CD pipeline where each time you push a commit in your repo, the amplify app automatically rebuilds to reflect the latest changes.
Once the app is built and deployed, you can visit your site by clicking on the ‘Domain’ link
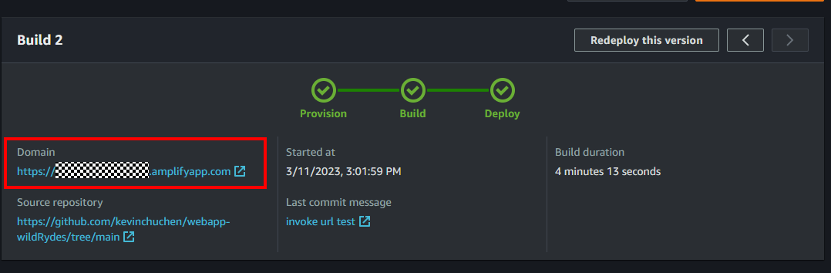
Congratulations, you have successfully hosted a static site!
Part 2: User and Permissions management
Permissions Management
To allow amplify to access other services within AWS, we will need to provide an authentication and authorisation method for the services. This is done via AWS Identity and Access Management (IAM). A policy can be created which allows Amplify to access the necessary services such as Systems Manager, Amazon Cognito, API gateway, etc. and a role can be attached to that policy which will inherit all the rules that the policy enforces. Amplify can then be configured to assume this role which grants access to all aforementioned resources.
In this test environment, I created an administrator policy which grants access to every actions in all AWS services and attached that to a role which AWS amplify will assume. In a production environment, this is not recommended and permissions should only be granted ONLY when required (least privilege principle).
#Policy document specifying what service can assume the role
data "aws_iam_policy_document" "amplify_assume_role"{
    statement {
        effect = "Allow"
        actions = ["sts:AssumeRole"]
        principals {
          type = "Service"
          identifiers = [ "amplify.amazonaws.com" ]
        }
    }
}
#IAM role providing admin access to aws resources
resource "aws_iam_role" "amplify-backend-role"{
    name = "amplify-backend-role"
    assume_role_policy =  data.aws_iam_policy_document.amplify_assume_role.json
    managed_policy_arns = ["arn:aws:iam::aws:policy/AdministratorAccess-Amplify"]
}
Similarly, permissions will need to be provided to the back-end lambda functions to interact with our DynamoDB table
#Policy document specifying what service can assume the role
data "aws_iam_policy_document" "lambda_assume_role"{
    statement {
        effect = "Allow"
        actions = ["sts:AssumeRole"]
        principals {
          type = "Service"
          identifiers = [ "lambda.amazonaws.com" ]
        }
    }
}
#Creates DynamoDB writeOnly policy
resource "aws_iam_policy" "wildrydes-DDB-writeOnly" {
  name = "WildRydes-DynamoDB-WriteOnly"
  description = "Allows WildRydes lambda function write access to DynamoDB"
  policy = jsonencode({
    Version = "2012-10-17"
    Statement = [
      {
        Action   = ["dynamodb:PutItem"]
        Effect   = "Allow"
        Resource = var.lambda-dynamoDB-ARN
      },
    ]
  })
}

#Attach IAM policy to IAM role providing lambda ExecutionRole and DynamoDB read access
resource "aws_iam_role" "lambda-role"{
    name = "wild-rydes-lambda-iam-role"
    assume_role_policy =  data.aws_iam_policy_document.lambda_assume_role.json
    managed_policy_arns = ["arn:aws:iam::aws:policy/service-role/AWSLambdaBasicExecutionRole",aws_iam_policy.wildrydes-DDB-writeOnly.arn]
}
IMPORTANT: Permissions are required by AWS API Gateway to be able to invoke the lambda function when provisioning the API Gateway resource via Terraform. Not providing permissions will lead to an unrelated CORS error with a status 500 when making a call to the API, making it hard to debug. Manually provisioning the API will not lead to this issue as AWS automatically grants permissions to invoke Lambda functions. This was not mentioned in any of the Terraform and AWS docs and I had to painstakingly find out the root cause.
resource "aws_lambda_permission" "apigw" {
  statement_id  = "AllowAPIGatewayInvoke"
  action        = "lambda:InvokeFunction"
  function_name = "${var.lambda-function-arn}"
  principal     = "apigateway.amazonaws.com"
  source_arn    = "${aws_api_gateway_rest_api.api-gateway.execution_arn}/*/*/*"
}
User Management
This site allows user to log in, sign up and authenticate with the backend. To achieve that, the users are managed by Amazon Cognito which is a fully managed identity storage service that supports social and enterprise identity federation. The AWS Amplify CLI natively supports Cognito, but this will not work well with an IaC tool like Terraform since the resource will be created and managed by Amplify instead of through a Terraform state. This means that additional modifications/removal of the Cognito resource must be done through the Amplify CLI instead of directly via Terraform.
Therefore, we will create a new Cognito user pool via Terraform and integrate it with the existing Amplify app that we hosted.
First, we create a new Cognito user pool. Most of the settings are left at a default.
#Creates an AWS cognito resource

resource "aws_cognito_user_pool" "cognitoPool" {
  name = var.cognitoPool-name
}
resource "aws_cognito_user_pool_client" "cognitoClient" {
  name = var.cognitoClient-name
  user_pool_id = aws_cognito_user_pool.cognitoPool.id
}
To integrate it with the Amplify app, we need 3 parameters: the User Pool ID, the Client ID, and the Native Client ID (optional for this app; as of writing this, there is a bug with this resource that Cognito would not integrate with Amplify without the native client ID. Set it to be the same as Client ID).
The parameters created from Cognito are then saved as an SSM Parameter with AWS Systems Manager and also as an environment variable within Amplify. These parameters will be imported to the Amplify app.
#Creates SSM Parameters to import to the webapp
resource "aws_ssm_parameter" "userPoolId" {
  name  = var.userPoolId_name
  type  = "String"
  value = aws_cognito_user_pool.cognitoPool.id
}
resource "aws_ssm_parameter" "clientId" {
  name  = var.clientId_name
  type  = "String"
  value = aws_cognito_user_pool_client.cognitoClient.id
}
resource "aws_ssm_parameter" "nativeClientId" {
  name  = var.nativeClientId_name
  type  = "String"
  value = aws_cognito_user_pool_client.cognitoClient.id
}
module "create-Cognito-resource"{
source = "./modules/awsCognito_ssmParameter"
cognitoPool-name = "wild-rydes-userPool"
cognitoClient-name = "wildRydesClient"
userPoolId_name = "/amplify/${module.create-amplify-env.Amplify-App-ID}/prod/userPoolId"
clientId_name = "/amplify/${module.create-amplify-env.Amplify-App-ID}/prod/webClientId"
nativeClientId_name = "/amplify/${module.create-amplify-env.Amplify-App-ID}/prod/nativeClientId"
}
environment_variables = {
        USER_BRANCH = "prod",
        _LIVE_UPDATES = <<-EOT
         [{"name":"Amplify CLI","pkg":"@aws-amplify/cli","type":"npm","version":"latest"}]
         EOT
        AMPLIFY_NATIVECLIENT_ID = var.AMPLIFY_NATIVECLIENT_ID
        AMPLIFY_USERPOOL_ID = var.AMPLIFY_USERPOOL_ID
        AMPLIFY_WEBCLIENT_ID = var.AMPLIFY_WEBCLIENT_ID
        API_GATEWAY_INVOKEURL = var.API-GW-InvokeUrl
}
Finally, these variables are used to integrate the Cognito resource with the Amplify resource via the build specifications. The `$secrets` variable is used to access the SSM Parameters.
build_spec = <<-EOT
        version: 1
        backend:
            phases:
                build:
                    commands:
                        - '# Execute Amplify CLI with the helper script'
                        - yum install jq -y
                        - npm i amplify-headless-interface
                        - amplifyPush --simple
                        - echo $secrets > authconfig.importauth.json
                        - cat authconfig.importauth.json | jq -c '. += {"version":1}' | amplify import auth --headless
                        - echo "VUE_APP_APIGW_INVOKEURL=$API_GATEWAY_INVOKEURL" >> .env
                        - cat .env
                        - amplifyPush --simple
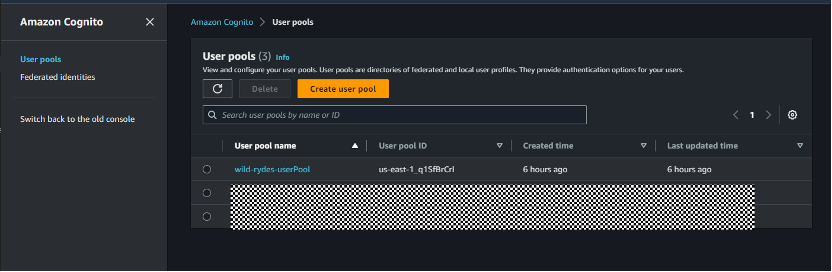
Once the app is rebuilt and the terraform plan applied, you should find a new user pool created by Terraform, with all the parameters stored in the Systems manager. The authentication page of the WebApp should be integrated and users can be managed via the Cognito Dashboard.

Part 3: The Serverless Backend
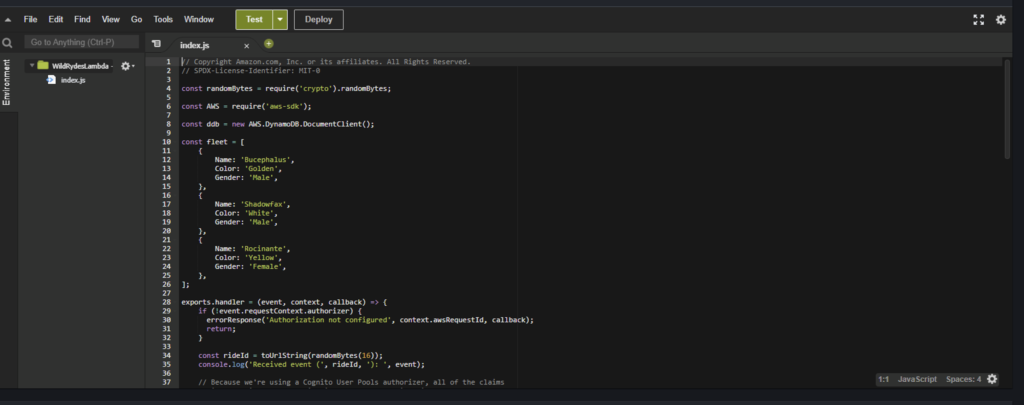
The backend handles all the server-side logic and handles the main function from arranging rides to keeping track of which user has ordered a ride. To do this in a serverless manner, we will provision a Lambda function coupled with a DynamoDB table. The Lambda function will trigger each time it is invoked by the API Gateway (more details in the next part) and the function picks a ride to your specified location, and all data is kept in a DynamoDB table.
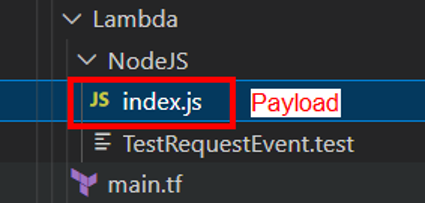
To create a Lambda function with Terraform, the payload will have to be compressed (.zip) and that is done using `archive_file` terraform data source. Note that the zip file will not be created locally when the Terraform plan is applied, so create the Lambda function concurrently to verify that the payload is successfully deployed into Lambda. The function to test the deployed Lambda function can be found in the `TestRequestEvent.test` file. Unfortunately currently there is no way to automatically include this custom test within the Lambda function so it has to be done manually through the Lambda console.
#Creates a lambda function for full serverless backend - coupled with the required IAM permissions to access AWS services
data "archive_file" "lambda" {
  type = "zip"
  source_file = "${path.module}/NodeJS/index.js"#var.lambda-source
  output_path = "${path.module}/NodeJS/lambda.zip"#var.lambda-output
}
resource "aws_lambda_function" "order_ride_lambda" {
  filename = "${path.module}/NodeJS/lambda.zip"
  function_name = "WildRydesLambda"
  role = aws_iam_role.lambda-role.arn
  handler = "index.handler"
  source_code_hash = data.archive_file.lambda.output_base64sha256
  runtime = "nodejs12.x"
}
Next, we will need to create a DynamoDB table to store the request details in a noSQL schema. To do that, apply the Terraform configuration below. This will create a DynamoDB table named `Rides` with an attribute key of `RideId`.
#Creates a DynamoDB table to track orders
resource "aws_dynamodb_table" "dynamoDB-main" {
    name = "Rides"
    hash_key = "RideId"
    billing_mode   = "PAY_PER_REQUEST"

    attribute {
        name = "RideId"
        type = "S"
    }
}
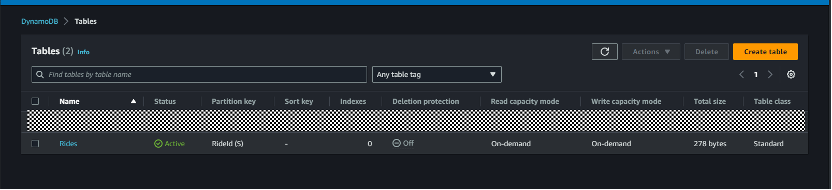
That’s it! The Lambda function and the DynamoDB table has been configured with the correct payload as shown:

For now, there is no integration with the front-end and the backend lambda function. To do that, we will need an externally facing API to interact with the private Lambda function.
Part 4: REST API
To allow the public internet to interact with our Lambda function, we will need an API to act as a middle-man to call our function by using AWS API Gateway. To create an API in Terraform, we will need to set the authorizer to define who can trigger this API (in our case only logged in users can invoke the API), the gateway method, deployment stage, and method response. A deployment trigger was also initialised so that changes made to the terraform plan will automatically trigger a redeployment of our API.
#API Gateway acts as an entry point for the webapp to trigger lambda function

resource "aws_api_gateway_rest_api" "api-gateway" {
    name = "${var.API-GW-name}-API-gateway"
}

resource "aws_api_gateway_authorizer" "api-GW-authorizer" {
    name = "${var.API-GW-name}-authorizer"
    rest_api_id = aws_api_gateway_rest_api.api-gateway.id
    type = "COGNITO_USER_POOLS"
    provider_arns = [var.cognito-UserPool-Arn]
}

resource "aws_api_gateway_resource" "api-GW-resource" {
  parent_id   = aws_api_gateway_rest_api.api-gateway.root_resource_id
  path_part   = "ride"
  rest_api_id = aws_api_gateway_rest_api.api-gateway.id
}

resource "aws_api_gateway_method" "api-GW-POST" {
  rest_api_id   = aws_api_gateway_rest_api.api-gateway.id
  resource_id   = aws_api_gateway_resource.api-GW-resource.id
  http_method   = "POST"
  authorization = "COGNITO_USER_POOLS"
  authorizer_id = aws_api_gateway_authorizer.api-GW-authorizer.id
}

resource "aws_api_gateway_stage" "api-GW-stage" {
  deployment_id = aws_api_gateway_deployment.api-GW-deployment.id
  rest_api_id   = aws_api_gateway_rest_api.api-gateway.id
  stage_name    = var.stage-name
}

resource "aws_api_gateway_method_response" "response_200" {
  rest_api_id = aws_api_gateway_rest_api.api-gateway.id
  resource_id = aws_api_gateway_resource.api-GW-resource.id
  http_method = aws_api_gateway_method.api-GW-POST.http_method
  response_models = {"application/json" = "Empty"}
  status_code = 200
  response_parameters = {
    "method.response.header.Access-Control-Allow-Headers" = true,
    "method.response.header.Access-Control-Allow-Methods" = true,
    "method.response.header.Access-Control-Allow-Origin" = true,
  }
  depends_on = [aws_api_gateway_method.api-GW-POST]
}

resource "aws_api_gateway_integration" "apiGW-Lambda-Integration" {
  rest_api_id   = aws_api_gateway_rest_api.api-gateway.id
  resource_id   = aws_api_gateway_resource.api-GW-resource.id
  http_method   = aws_api_gateway_method.api-GW-POST.http_method
  integration_http_method = "POST"
  type          = "AWS_PROXY"
  uri           = var.lambda-invoke-arn
}

resource "aws_api_gateway_deployment" "api-GW-deployment" {
  rest_api_id = aws_api_gateway_rest_api.api-gateway.id
  stage_name = var.stage-name
  depends_on = [
    aws_api_gateway_method_response.response_200,
    # aws_api_gateway_integration_response.apiGW-integration-response
  ]
  triggers = {
    redeployment = sha1(jsonencode([
      aws_api_gateway_resource.api-GW-resource.id,
      aws_api_gateway_method.api-GW-POST.id,
      aws_api_gateway_integration.apiGW-Lambda-Integration.id,
    ]))
  }

  lifecycle {
    create_before_destroy = true
  }
}
For security reasons, most modern web browsers don’t allow calling an API from a domain that is different from the host domain by default; this is known as having Cross Origin Resource Sharing (CORS) disabled. This is done to prevent malicious API calls to unknown domains.
In this case, we will need to execute this API using an invoke URL that is provided by API-Gateway, and the host domain provided by AWS Amplify. Therefore, we will need to enable CORS in our API-Gateway requests. This can be done via the `api-gateway-enable-cors` module by providing our API ID and the Resource ID, and the module will automatically create an OPTIONS method required to enable CORS. Ideally, in a production environment, our API should be prefaced with the same domain as our client site, by using a custom domain name – effectively eliminating the risks for enabling CORS
module "api-gateway-enable-cors" {
source = "squidfunk/api-gateway-enable-cors/aws"
version = "0.3.3"
api_id = module.create-API-Gateway.API-GW-ID
api_resource_id = module.create-API-Gateway.API-GW-Resource-ID
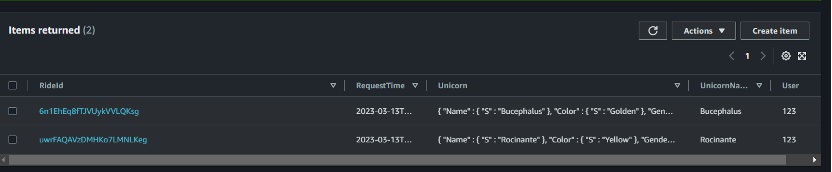
}After enabling CORS, we can integrate our API with our WebApp by passing the API invoke url to our Amplify app as environment variables. After applying the terraform plan and logging into the web app, our API will trigger the Lambda function which sends a ride to the location of our choosing:
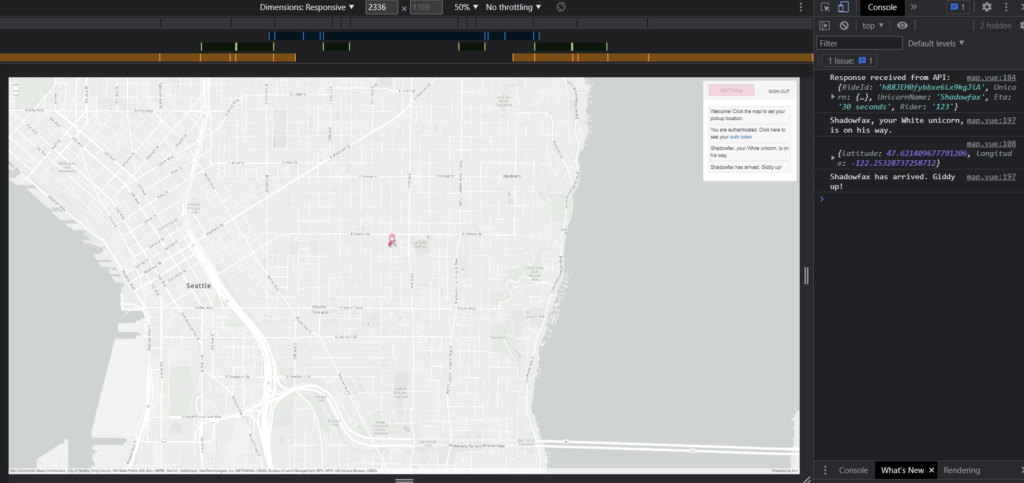
Checking our DynamoDB table, the lambda function also created these elements within the table with the ride details:
Conclusion
That’s it! We have successfully deployed a web app based on a serverless architecture, and we are only billed according to the resources used. Running `terraform apply` in another AWS environment will automatically host another application, in the exact same state as the current environment.
To tear down the infrastructure, it’s as simple as running `terraform destroy` and all the resources created will be torn down in just a few seconds*. There is also no need to worry about forgetting to delete some of the resources created and incurring additional costs; which I believe is the main advantage of using an IaC tool like Terraform.
This was an interesting project for me to familiarize myself with Terraform and how the AWS Cloud ecosystem connects to one another. I have definitely learnt a lot trying to problem-solve and critically think through some of the less-documented issues.
Thank you for reading! If you have any questions or any job opportunities in the Cloud sector, don’t hesitate to contact me via my e-mail and check out my Github for more projects like this!
*side note: There will be a CloudFormation stack created by Amplify during initialisation, which creates an S3 bucket with the Amplify state and some IAM Auth roles used in Cognito. These does not get removed by Terraform and have to be removed manually but it does not incur any charges when ignored.